If you’re looking to enhance the beauty and character of your outdoor space, building a dry stacked stone wall can be an excellent choice. These walls not only add visual appeal but also provide functional benefits such as defining boundaries, retaining soil, and creating seating areas. In this blog, we will guide you through the process of building a dry stacked stone wall, from the necessary materials to the step-by-step construction process.

Materials Needed
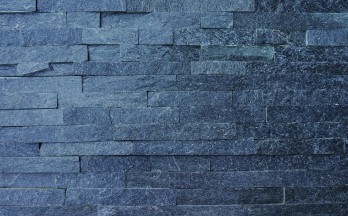
- Stones: Choose durable and flat stones with varying shapes and sizes. The exact amount will depend on the desired height and length of your wall
- Gravel: Use crushed gravel for the base and backfill
- Sand: Coarse sand is necessary for levelling the stones
- Landscape fabric: This optional material helps prevent weed growth behind the wall
- Shovel: Required for digging the trench and levelling the base
- Tamper: Used to compact the base and backfill
- Level: Ensures the stones are laid straight and level
- Rubber mallet: Helps to adjust and tap the stones into place
- Safety gear: Gloves, safety glasses, and sturdy footwear are essential
Time Taken
The time required to build a dry stacked stone wall depends on its size, complexity, and experience. It can take anywhere from a few days to a few weeks. Remember to plan accordingly and allocate sufficient time for each stage of the construction process.
Step-by-Step Guide to Building a Dry Stacked Stone Wall
1. Plan and Prepare
- Determine the desired location, height, and length of the wall
- Mark the area using stakes and string lines
- Call utility companies to check for any underground cables or pipes
- Clear the site of any debris, vegetation, or obstructions
2. Dig the Trench
- Use a shovel to dig a trench along the string lines
- The trench should be about twice as wide as the stones and deep enough to accommodate the first course of stones and a stable base.
- Ensure the trench is level by using a level and adjusting as needed
3. Create a Gravel Base
- Pour a layer of crushed gravel into the trench, around 4-6 inches deep
- Use a tamper to compact the gravel firmly. Check for levelness periodically
4. Lay the First Course
- Select the flattest and largest stones for the first course
- Place the stones side by side, ensuring they are level and aligned with the string lines
- Tap them gently with a rubber mallet to secure them in place
5. Continue Stacking
- Build subsequent courses by placing stones on top of each other, staggering the joints
- Mix and match different sizes and shapes of stones for a natural look
- Tap each stone into place, ensuring they are level and secure
6. Backfill and Compact
- Fill the space behind the wall with crushed gravel or sand
- Use a tamper to compact the backfill material firmly
- Repeat this process as you progress with each course
7. Finish the Top Course
- Select flat stones for the top course
- Ensure they are level and aligned with the string lines
- Tap them gently into place
8. Finishing Touches
- Clean any excess dirt or debris from the stones
- Inspect the wall for any loose stones and reposition them if necessary
Stacked Stone Cladding: An Alternative Solution
While constructing a dry stacked stone wall offers a timeless appeal, it can be a labour-intensive and time-consuming task. For those seeking a more cost-effective and less complex alternative, stacked stone cladding is a viable option. Stacked stone cladding provides the appearance of a dry stacked stone wall but is installed using a different method.
Stacked stone cladding involves attaching stone veneers to a substrate, such as a wall or a panel, using adhesives or fasteners. These veneers are typically made from lightweight materials, such as high-density polyurethane or cement, which mimic the look and texture of natural stone. Here are some advantages of stacked stone cladding:
Cost-Effective: Stacked stone cladding is often more affordable than building a traditional dry stacked stone wall. The materials used for cladding are less expensive, and the installation process requires less labour and time.
Easy Installation: Installing stacked stone cladding is relatively straightforward, making it a suitable choice for DIY enthusiasts. The veneers come in pre-cut panels or individual pieces, which can be easily mounted onto the substrate using adhesives or fasteners.
Lightweight: Stacked stone cladding materials are lightweight, which simplifies handling and reduces the load on the supporting structure. This aspect makes it suitable for applications where weight considerations are important, such as on existing walls or structures that may not be able to bear the weight of a full stone wall.
Versatility: Stacked stone cladding offers a wide range of design options and can be used both indoors and outdoors. It can be applied to walls, columns, fireplaces, and other surfaces, providing a unique and stylish appearance.
Low Maintenance: Stacked stone cladding requires minimal maintenance compared to natural stone walls. It is resistant to weathering, fading, and cracking. Simply occasional cleaning with water and mild detergent can keep it looking fresh and vibrant.
When considering stacked stone cladding, keep the following steps in mind:
Prepare the Surface: Ensure that the surface where you will apply the stacked stone cladding is clean, dry, and free from any loose debris or paint. If necessary, use a primer or bonding agent to improve adhesion.
Measure and Cut: Measure the dimensions of the area to be clad and cut the stacked stone veneers accordingly. Most cladding materials are easy to cut using a saw or shears.
Apply Adhesive: Using a recommended adhesive, apply it to the back of the stacked stone veneers or directly onto the substrate. Follow the manufacturer’s instructions for proper application and curing times.
Install the Veneers: Carefully press the stacked stone veneers onto the prepared surface, starting from the bottom and working your way up. Use a level to ensure they are straight and aligned. Apply gentle pressure to ensure a secure bond.
Fill the Joints: If desired, fill the gaps between the stacked stone veneers with grout or a sealant of your choice to enhance the appearance and provide additional protection.
Remember, always refer to the manufacturer’s instructions for specific guidelines on installation, as different products may have varying requirements.
In the end
Building a dry stacked stone wall can be a labour-intensive endeavour, requiring time, skill, and effort. However, if you’re looking for a more cost-effective and less complex alternative that still offers the aesthetic appeal of a stacked stone wall, stacked stone cladding is a viable option. It provides versatility, ease of installation, and low maintenance, making it a practical choice for both indoor and outdoor applications. Consider your specific needs and preferences, and explore the world of stacked stone cladding to add a touch of timeless elegance to your space.