The Versaloc® Walling System by Adbri Masonry offers a smart, mortar-free solution that delivers significant time and cost savings on-site. Designed as a true dry stack walling system, Versaloc allows blocks to be quickly and precisely assembled without the need for mortar, boosting efficiency from the ground up.
The following are steps on how you can build using Versaloc.
Preliminary
Excavate to a satisfactory foundation.
Arrange for the supply of materials to the specifications given previously.
Base and starter bars
Form the base to the required dimensions and levels
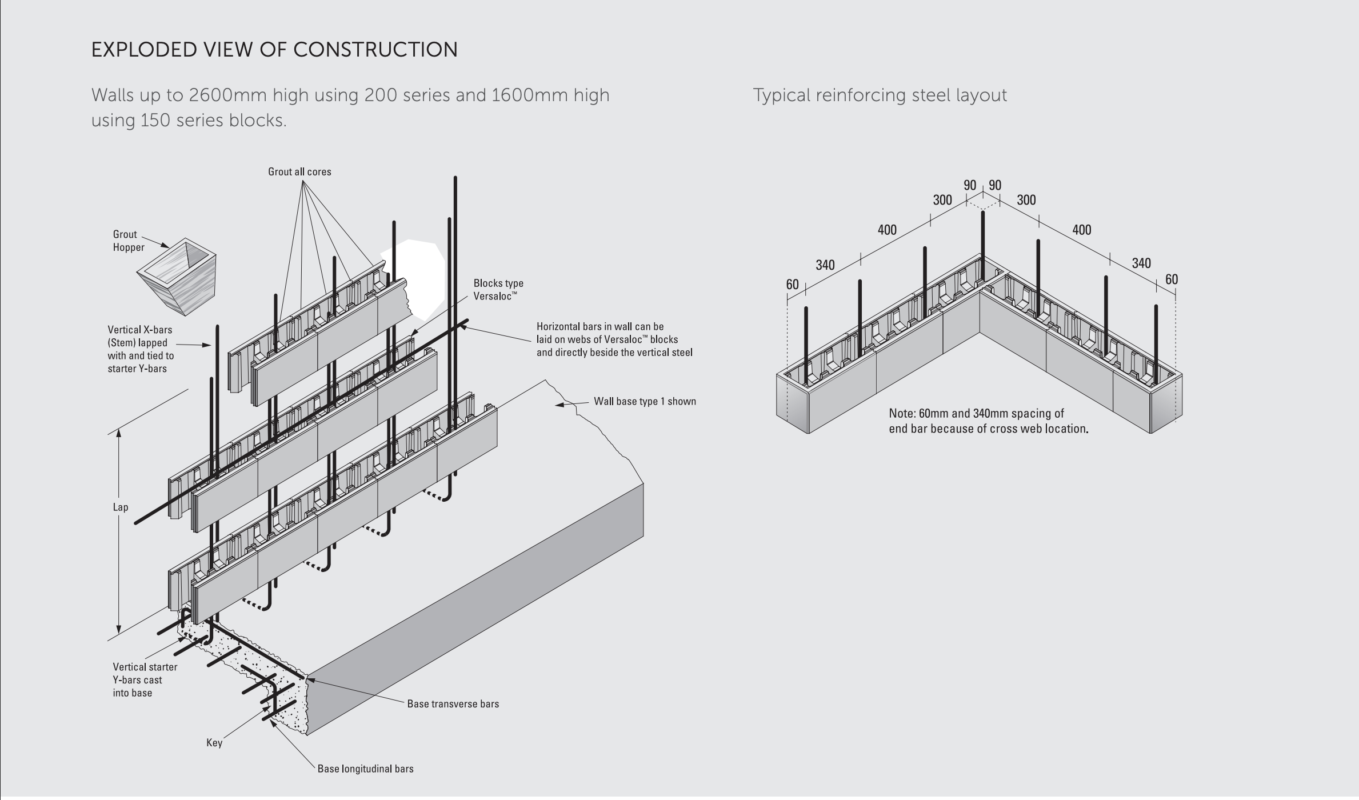
Place the base reinforcement. Fix the tarter bars for the vertical reinforcement (Y-bars) at the correct cover specified in the drawing from the back face of the wall (i.e. 50mm) and in the correct positions relative to the block cores to be
reinforced. Place horizontal bars in the center on the cross webs.
Place the base concrete, preferably using ready-mixed concrete, and compact thoroughly by rodding, spading or vibrating. Wood float finish any surface to be exposed permanently. Take care not to dislodge reinforcement.
Note: First reinforcement bar is placed at 60mm from the end (to avoid cross web).
Block laying
Block laying procedure follows that of the normal practice but without the need to mortar the blocks together. Note: The first layer of blocks should be mortared to the concrete base in the normal way to provide line and level for the remaining block courses.
The blocks are laid with the shallow recessed cross webs at the top (refer to the exploded view of construction). During construction, it is important to keep debris off the bed joint plane; otherwise the wall may begin to develop vertical curvature. In addition, as a unit is positioned, some small particles of concrete may be rubbed off the units and fall on the bed joint surface. Usually the force of placing the block will crush these particles. Otherwise, rubbing the block back and forth along the joint will wear down the material. If a joint is visibly open, the unit should be removed and the debris removed. Note: Small plastic wedges can be used under blocks to achieve vertical alignment.
Provided the construction is started on a level surface, use of a line and spirit level should be all that are required to keep the wall aligned vertically and horizontally. In instances where the wall is accidentally laid out of line, this can usually be corrected by using a piece of wood to protect the wall and a heavy hammer to knock the wall back into line.
At the end of walls, Half End blocks may be glued to the block directly below using an appropriate adhesive to increase stability. (eg 2 part epoxy or equivalent)
Blocks should be laid in running bond with head joints aligned vertically every second course. Exact overlapping by half of a block will ensure that the webs and cells are aligned vertically.
Weepholes can be provided by passing 50mm diameter uPVC pipes through holes in the wall at 1200mm centres.
Reinforcement for wall stems must be positioned accurately, and tied securely before placing concrete or grout. Refer to design cover requirements for vertical reinforcing bars (X bars), including started bars (Y bars).
Bracing
During grouting of Versaloc walls, it is recommended that suitable bracing be used to support the wall.
Temporary bracing of partially built Versaloc walls is also recommended and especially during windy conditions.
Corefilling
Versaloc blocks have large cores inside to allow for adequate flow of corefill and ensuring complete coverage of reinforcing steel bars. As Versaloc® requires no mortar above the first course, there are no mortar dags on the steel, allowing adequate flow of the corefill and minimal chance of voids in the wall.
The corefill must be sufficiently fluid to fill all the voids, bond together adjacent masonry units, bond steel reinforcement into the cores, and to unify the wall into a single structure. It is therefore important that the cores are filled with corefill which meets the specifications listed in the following section.
Corefill Specifications
The corefill specifications are performance based. Adbri Masonry recommends the corefill supplier determine an appropriate mix design to meet the following performance requirements. The performance details are as follows:
01 — Flow Characteristics
- Versaloc® Block 150 Series – f’uc = 20MPaVersaloc® Block 200 Series – f’uc = 20MPa
- Versaloc® Block 300 Series – f’uc = 20MPa
- Concrete Base – f’c = 25MPa
- Reinforcement Corefill – Grade 500N, f’c = 20MPa with a pourable consistency (200-250mm slump) and a cement content not less than 300kg/m3
Where possible, use ready-mixed corefill and specify when ordering that it is for filling blockwork. If the corefill is mixed on site, use the following proportion:
- Cement – 1 part
- Hydrated lime – Up to 1/10th part
- Mortar sand – 3 parts
- 10mm aggregate – Up to 2 parts
- 10mm aggregate should be rounded gravel if possible. Grout should be mixed in a tilting mixer and should flow freely without separating aggregate.
Notes
- For grout specifications please refer to the Versaloc Technical Brochure.
- The minimum MPa requirement can increase to 25 MPa or 32 MPa depending upon proximity to the coastline and application
for product.
02 — Strength Grade
Following testing by CSIRO on behalf of Adbri Masonry “grout cover” to steel requirements used with the Versaloc® system can be less than required by AS3600 – contact Adbri Masonry for test report details.
03 — Other
Maximum aggregate size shall be 10mm (for 190mm block) and 7mm (for 140mm block). The grout shall be free of contaminating lumps larger than 15mm (this may require a screen over the pump hopper). The grout shall be smooth, free-flowing and cohesive.
Notes
- A ‘cohesive’ mix is one which has no tendency to segregate when pumped down into the Versaloc® cavity. The concrete supplier should use a high-quality superplasticiser to achieve the flow characteristics required.
- Due to hydrostatic pressure build up by the fluid core-fill grout, a maximum filling height between pours of 1.8m (i.e. 9 courses),
is strongly recommended. - Any cold joint or break between pours should occur at mid height of unit to prevent it being located at a bedding joint.